Workstation Setup
This page is a work in progress
How to set up a developer's local workstation so it is aligned with project standards and requirements. Managing Python versions and utilizing virtual environments is key to a developer's local environment.
1. Install Visual Studio Code (VSCode)
Visual Studio Code (VSCode) is the integrated development environment (IDE) of choice for our developers. Download VSCode here for your specific operating system (OS).
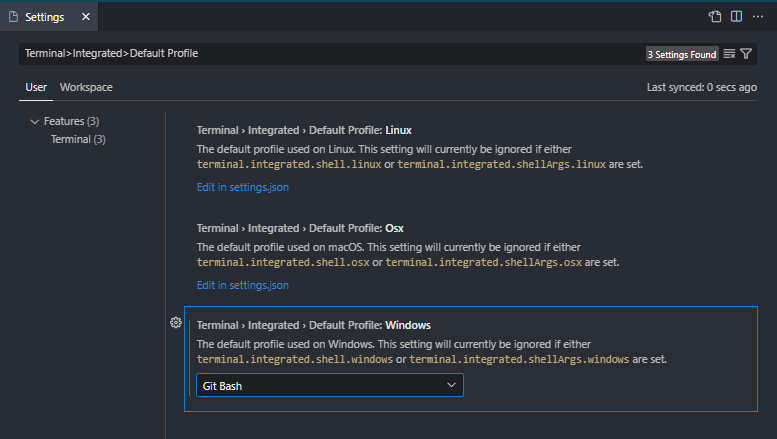
For Windows developers, set the default shell for VSCode's integrated terminal as Git Bash. To do this go to Settings and in the search bar enter Terminal>Integrated>Default Profile and for Windows select Git Bash from the dropdown box.
Now as a Windows developer you have access to bash.
2. Install pyenv
pyenv is a tool used to manage multiple versions of Python on your computer. It allows you to download multiple versions and switch between desired versions from the CLI.
Learn more about pyenv here.
- Windows
- Mac OS
Windows Instructions:
Create a directory in your user folder called .pyenv by entering the following in PowerShell's command line.
> mkdir $HOME/.pyenv
Download the pyenv-win ZIP-archive here. Download the ZIP-archive somewhere you can access it. Once the ZIP-archive is downloaded, extract and move all the files to the .pyenv directory you just created.
Set the environment variables PYENV and PYENV_HOME that point to the installation folder by entering the following in the command line.
> [System.Environment]::SetEnvironmentVariable('PYENV',$env:USERPROFILE + "\.pyenv\pyenv-win\","User")
> [System.Environment]::SetEnvironmentVariable('PYENV_HOME',$env:USERPROFILE + "\.pyenv\pyenv-win\","User")
Add the bin folder to the PATH variable so pyenv can be found when using the command line by entering the following in the command line.
> [System.Environment]::SetEnvironmentVariable('path', $env:USERPROFILE + "\.pyenv\pyenv-win\bin;" + $env:USERPROFILE + "\.pyenv\pyenv-win\shims;" + [System.Environment]::GetEnvironmentVariable('path', "User"),"User")
Close the current window of PowerShell for the commands to be applied.
Open a new window of PowerShell and enter the following in the command line to confirm pyenv has been installed successfully.
> pyenv
MacOS Instructions:
For MacOS developers, the default shell will be the default shell used in your terminal. For many, this is now zsh rather than bash. The core functionality of zsh and bash do not differ greatly but some instructions in this document may need to be modified depending on the shell you are using.
Before pyenv can be installed, the following must be installed:
XCode command line tools, Homebrew, openssl, readline, sqlite3, xz and zlib.
Installation instructions: XCode
To check if XCode is installed already, in the terminal command line enter the following to print the location of the package.
$ xcode-select -p
If a directory is printed, then XCode is installed. For example,
/Library/Developer/CommandLineTools
If an error is printed, then XCode is not installed. For example,
xcode-select: error: unable to get active developer directory...
To install XCode enter the following in the command line.
$ xcode-select --install
Installation instructions: Homebrew
To check if Homebrew is installed already, in the terminal command line enter the following to print the version of the package.
$ brew --version
If a version is printed, then Homebrew is installed. For example,
Homebrew 2.2.2
If an error is printed, then Homebrew is not installed. For example,
brew: command not found
To install Hombrew enter the following in the command line.
$ /bin/bash -c "$(curl -fsSL https://raw.githubusercontent.com/Homebrew/install/HEAD/install.sh)"
Installation instructions: openssl, readline, sqlite3, xz, zlib
To install openssl, readline, sqlite3, xz and zlib libraries enter the following in the command line.
$ brew install openssl readline sqlite3 xz zlib
Using Homebrew install pyenv by entering the following in the terminal command line.
$ brew update
$ brew install pyenv
After pyenv has been successfully installed, add pyenv to your $PATH by entering the following in the command line. For bash replace .zshrc with .bashrc.
$ echo 'eval "$(pyenv init --path)"' >> ~/.zshrc
Close/exit the current terminal for the command to be applied.
Open a new terminal and enter the following in the command line to confirm pyenv has been installed successfully.
$ pyenv
3. Install Python using pyenv
pyenv is our Python version manager. Therefore, when installing any version of Python we will be using pyenv.
To avoid confusion between different OS systems Windows developers should use VSCode's integrated terminal. It is also recommended that MacOS developers complete the next steps in VSCode's integrated terminal as well so they can become familiar with VSCode's terminal.
To see all available versions of Python for installation enter the following in the terminal command line.
$ pyenv install -l
To install a version of Python enter the following in the terminal command line.
$ pyenv install [PYTHON_VERSION]
We are currently using Python version 3.9.13. Install this version of Python by entering the following in the command line.
$ pyenv install 3.9.13
To view which versions of Python have been installed enter the following in the command line.
$ pyenv versions
The version with the (*) in front is the current active version. For example,
  3.10.0rc1
* 3.9.6
  pypy3.7-7.3.5
To view only the current active version enter the following in the command line.
$ pyenv version
It is important to set a global version of Python when having multiple versions of Python installed. The global version of Python is the default version of Python that will be used unless otherwise specified. To set the global version of Python enter the following in the command line.
$ pyenv global [PYTHON_VERSION]
The global version of Python does not necessarily need to be version 3.9.13. (A specific version of Python will be necessary for different projects and can be different than an operating system's global version.) For now, you may set the global version of Python as 3.9.13.
The other key benefit of pyenv is the ability to set a local version of Python for specific directories. This will be important when setting up virtual environments. The following is the command to specify a local version of Python in a directory.
$ cd [DESIRED_DIRECTORY]
$ pyenv local [PYTHON_VERSION]
5. Make a virtual environment using venv
venv is already included in Python's standard library so there is no additional action needed to install venv.
venv is a package that allows you to create and use virtual environments. Virtual environments create isolated environments to manage different package versions and allow developers to switch between various ones. With the addition of pyenv developers can also set different Python versions for each virtual environment.
Learn more about venv here.
Each virtual environment is stored and represented as a directory. Since it is possible and likely that developers will have multiple virtual environments we use the practice of storing all virtual environments in a central directory.
At the same directory level as .pyenv create a virtual environment central directory called .venv. To do this enter the following in VSCode's integrated terminal command line.
$ cd [DIRECTORY_LEVEL_OF_.PYENV]
$ mkdir .venv
All virtual environments should be created inside the .venv directory. To create a virtual environment enter the following in the command line.
$ cd .venv/
$ python -m venv [NAME_OF_VENV]
The above action will have created a directory inside .venv with the name that was entered. For example,
$ cd .venv/
$ python -m venv my_first_venv
$ ls -a
./ ../ my_first_venv/
Now that the virtual environment has been created you need to set desired Python version for the virtual environment. (This step must been done before installing any Python packages for the virtual environment.) To set the Python version for the virtual environment you must be inside the virtual environment first. Enter the following in the command line.
$ cd [NAME_OF_VENV]/
$ pyenv local [PYTHON_VERSION]
For example,
$ cd my_first_venv/
$ pyenv local 3.9.13
Note, you cannot change the Python version of a virtual environment after you have set it. To use a different version of Python you must create a new virtual environment.
6. Activate/deactivate virtual environment with alias
From the previous steps we have created a virtual environment. Before we can install packages to a virtual environment we must be able to activate the virtual environment.
In order to activate a virtual environment, you must refer to a specific activate script that is stored in the virtual environment's directory. Activation is slightly different between MacOS and Windows.
- Windows
- Mac OS
Windows Instructions:
For Windows users, you activate the virtual environment by referring to the activate script in the Scripts directory. For example,
$ cd [NAME_OF_VENV]/Scripts/
$ ls -a
./ ../ activate activate.bat Activate.ps1 ...
Therefore, to activate the virtual environment enter the following in the command line.
$ . /path_to_[NAME_OF_VENV]/Scripts/activate
MacOS Instructions:
For MacOS users, you activate the virtual environment by referring to the activate script in the bin directory. For example,
$ cd [NAME_OF_VENV]/bin/
$ ls -a
./ ../ activate activate.bat Activate.ps1 ...
Therefore, to activate the virtual environment enter the following in the command line.
$ . /path_to_[NAME_OF_VENV]/bin/activate
That is the end of the MacOS and Windows specific instructions.
Once the virtual environment has been activated, the command line will indicate that a virtual environment is active. Above the current line you will see the name of the active virtual environment in parentheses.
([NAME_OF_VENV])
$
For example,
$ . /path/.venv/my_first_venv/bin/activate

(my_first_venv)
$
To deactivate the virtual environment simply enter the following in the command line.
(my_first_vend)
$ deactivate

$
Once the virtual environment has been deactivated you will no longer see its name above the command line's current line.
Since it is a lot of manual work to specify the entire path to the activate script of the virtual environment every time you would like to activate it we recommend using aliases. To set the activation command for a virtual environment as an alias complete the following steps.
cd to your home directory.
$ cd
Check if you have a .zshrc file (or .bashrc if using bash).
$ ls -a
./ ../ .zshrc ...
If you do not have a .zshrc file, then create one.
$ touch .zshrc
Add the activation command as an alias to the .zshrc file.
$ cat >> .zshrc
alias [NAME_OF_VENV]='. /path/.venv/[NAME_OF_VENV]/bin/activate'

# ENTER CTRL+D TO SAVE AND EXIT EDIT MODE
Close/exit the current terminal for the alias to be applied.
Now, to activate the virtual environment enter the alias' name in the command line and the deactivate use the same method.
$ [NAME_OF_VENV]

([NAME_OF_VENV])
$

([NAME_OF_VENV])
$ deactivate

$
For example, if I have already added the activate command for my_first_venv in my .zshrc file
$ my_first_venv

(my_first_venv)
$

(my_first_venv)
$ deactivate

$
Note, these instructions work because Windows developers are using bash via VSCode's integrated terminal. The instructions do not work for Windows developers using PowerShell. Windows users should use VSCode's integrated terminal as the default terminal for their command line needs.
7. Set up virtual environment from requirements.txt
Virtual environments can be set up to a project's specific specifications by using the project's requirement.txt. The requirement.txt will specify all of the necessary packages and their exact versions that are required by the project.
For example,
dbt-core==1.4.4
dbt-snowflake==1.4.1
Assuming you have cloned the project repo, the requirements.txt that specifies the exact project requirements can be found at the top level of the directory and in the main branch. To install all of the packages from the requirements.txt to a virtual environment complete the following instructions from the terminal command line.
Make a new virtual environment in the .venv directory dedicated for the specified project. The naming convention for the virtual environment should indicate the specific project. Commonly the project name can be used as the virtual environment's name.
$ cd /path/.venv/
$ python -m venv [PROJECT_NAME]
Set the Python version for the virtual environment.
$ cd /path/.venv/[PROJECT_NAME]
$ pyenv local [PYTHON_VERSION]
Create an alias for the virtual environment.
$ cd
$ cat >> .zshrc
$ [PROJECT_NAME] = '. /path/.venv/[PROJECT_NAME]/bin/activate'

# ENTER CTRL+D TO SAVE AND EXIT EDIT MODE
Close/exit the current terminal for the alias to be applied.
Open a new terminal and activate the virtual environment.
$ [PROJECT_NAME]

([PROJECT_NAME])
$
Install the packages from the requirements.txt to the virtual environment.
([PROJECT_NAME])
$ pip install -r /path/project/requirements.txt
Check the packages that have been installed.
([PROJECT_NAME])
$ pip list
The virtual environment is now set up to the project's requirements. Every time you are working on the project activate the virtual environment first!